Wednesday, August 2, 2017

Weekly Menu

Our household runs so much smoother when I take the time to meal plan for the week. 


Sharing it here, with you, helps me stay motivated to do it & hopefully gives someone a new recipe idea! Please feel free to share your menus with me! 


Monday
Chicken Tikka Korma (crockpot meal) served with rice or you can sub cauliflower rice if watching carbs (Sauce is Onion, Garlic, Turmeric, Garam Marsala, Chili powder, Coriander, Cumin, Salt & pepper, Tomatoes, Coconut milk, & broth)

Tuesday
Lasagna- this is one of my favorite recipes, passed down from my mama! Served with garlic bread, roasted broccoli & salad!

1 garlic clove- diced
1 small onion- diced
1 lb ground beef
1 lb Italian sausage 
1 TBL parsley flakes
1 lb canned tomatoes
2 small cans of tomato paste
10 oz Lasagna noodles- healthier options- sliced Zucchini (sliced very thinly, long ways)
3 cups cottage cheese
2 beaten eggs
1 tsp salt
1/2 tsp pepper
2 TBL parsley flakes
1/2 C grated parmesan
1 lb Mozzarella cheese- thinly sliced

Sautee garlic and onion in olive oil, add meat- cook until meat is done
Add parsley & tomatoes- simmer about 30 minutes
Cook Lasagna noodles (use ingredients on box) if using or slice up Zucchini
Mix together in a bowl cottage cheese, eggs, salt, pepper, parsley & parm. cheese

In a 9x13 Layer- Noodles or Zucchini, Cottage cheese mixture, Mozzarella cheese slices, Meat mixture Repeat another time. 

Bake 30 min at 375, let rest 15 minutes 

Wednesday
Chicken Fried Rice 
Boneless, Skinless chicken thighs
Rice- Cauliflower or white
Coconut Aminos
Veggies
Salt & Pepper
Sesame &/or olive oil
Chop up any veggies you have on hand- I usually use carrots, celery, onions, garlic, Bok Choy
I use 2 skillets for this- one for chicken and one for the veggies. Heat up Sesame or olive oil in both skillets. I add the chopped veggies to one pan and the chicken (seasoned with salt & pepper) to the other. I usually cook my chicken thighs about 10 min each side. Then I chop up the chicken once it is all done and mix it in with veggies. I add Coconut Aminos and more salt and pepper. Serve with rice or cauliflower rice. I also add some Sesame oil. Coconut Aminos, salt & pepper to my rice. 


Thursday:
Tacos
I make my own taco seasoning. It's super simple, cheap and you know exactly what you are eating no additives! 
2 TBL Chili powder
1 1/2 tsp Cumin
1 tsp Paprika
1 tsp oregano
1 tsp garlic powder
1/4 tsp red pepper flakes
1 tsp salt
1/2 tsp pepper
Again a healthier option would be to make it into a salad or rice or cauliflower rice bowl. 

Friday
Left overs

Saturday:
Out to eat

Sunday
BLEATS
What are those you ask? Well we have turned a classic BLT's & added egg and avocado! 
If you are wanting to eliminate bread click here for a way to make BACON BOWLS- then you can just add the rest of your filings in the bowl- lettuce, tomato, egg (hard boil for this option), avocado! 

Some tips for making dinners healthier:
Cauliflower rice- I have tried many different kinds. Making your own is an option that I have done lots. It is messing and a little time consuming. I found pre-made is way easier but not all of them taste great. The BEST I have found is Trader Joe's brand 
Bread- we use Ezekiel Bread - click the link to find out more about it. Also if you are trying to eliminate bread there are lots of options! Wraps, Bacon Bowls (see link in BLEAT recipe for these), Spinach or lettuce. 


Also a little side note- I have some really fun new things that will be happening with my blog. Stay tuned for some exciting news!!!

Happy Planning!!

Faith


Sunday, April 2, 2017

Coffee Bar = My Happy Place

Ok, so I have a confession to make~ I seriously do not think that I could live without coffee. Like for real!!!!  I have an area in my kitchen that is dedicated to Coffee! So this week it got the love and dedication it truly deserves :)

The first thing I needed to do was sort all the coffee accessories because it has seriously gotten a little out of hand. So that process looked a little like this..


And honestly, I had already done some purging by the time I remembered to take some pictures!


Then after I had removed all of this stuff, I cleaned out the shelves and put a fresh new shelf liner in where the mugs will go.


Taking everything out of the space that is being organized is something that I highly recommend! Once it is all clean, the item has to be worthy of this new cleaned out space!!

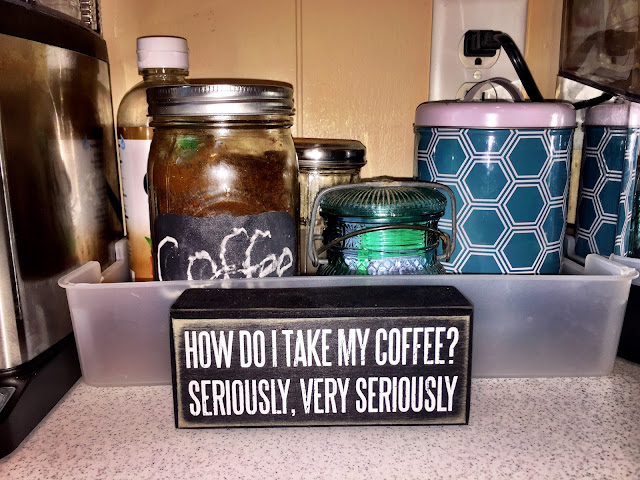
In this cabinet I keep coffee mugs, coffee, hot chocolate, tea, wine, & a coffee grinder. After sorting through all of these items, I found containers to house them in. Labeling is fun to me, so I added some labels as well.


The counter of my coffee bar looks like...


On the very right is a water infuser (incase you were wondering what it was :)

How cute is that sign? Also in this caddy I have liquid coconut oil, cinnamon, ground coffee, sweetners, and some tea bags.


This coffee bar works for us in our space, but there are so many fun ideas on making a coffee bar. Here are some fun ideas from the great world of Pinterest!! Just click on source under each picture for the details!


I love this for a kitchen that is tight on space!  source


Do you have a coffee bar, or maybe another favorite space dedicated to something you love? 

Thanks for stopping by!

Faith 

Saturday, February 11, 2017

Cleaning out the drawers!!

Cleaning and organizing kitchen drawers is a bit of a tedious task, but it is something you can do 1 drawer at a time, so you don't have to get stuck in some HUGE project~ which can make it more manageable!!

My step-by-step for cleaning out a drawer is:

  • Take EVERYTHING out
  • Sort through each item from the drawer 
  • Wipe down the entire inside of the drawer
  • Add a drawer liner if that is your kind of thing :)
  • Add an organizing tool if wanted
  • Put back the items that "made the cut"


Here is a drawer that I worked on...


So many things that bother me about this area.  First of all excessiveness. I mean- who needs so many knives in the first place!! There are so many things that we don't use or need here. It also is a very cluttered area AND the drawer liner that is in this drawer is not my favorite.

Step 1~ Everything came out of the drawer!!
Step 2~ I purged and cleaned out the things that we use and things that we don't

Sometimes you find something in a spot, that makes more sense somewhere else. As I was sorting through all of the items in this drawer & came to my can opener. I had a little aha moment! Why not keep things where they are used.


Here I added a ring to the handle of my can opener and attached a command hook in my pantry, next to all the canned goods. TADA!!! 


Step 3~ Wipe down drawer 
Step 4~ Add drawer liner!! 

Step 5~ Organizing tools! This can be the most fun part! Especially if you can find exactly what you are looking for! I found this on Amazon here and I ordered 2. Remember if you are purchasing something, measure your space first. This will save time, money & frustration~ I PROMISE!!


Last step~ putting back the items that "made the cut" (did anyone notice the pun here :)

Bonus I was able to get rid of the knife block on the counter so a little less clutter always makes this girl happy!! 


Thanks for stopping by friends!!

Faith


Sunday, January 22, 2017

Project Pantry!

This weekend I wanted to be able to check off cleaning out and organizing my pantry. The pantry basically stores every food item that is not in the fridge or freezer. It is a good size space, but I have found sometime that has meant, a great place to shove lots of stuff in and shut the door. This has been a project that I have worked on several times, but have never finalized it. My first few attempts focused more on making it look pretty and not functional. I have learned over the years that function has to be the top priority when organizing any space, or else it just wont last.

One thing that I have not done before, is take EVERYTHING out!


At this point I was really wondering what I had got myself into!!


This gave me the opportunity to scrub each shelf & sweep and mop the floor. Then with it empty, I could really think about how I wanted to use each shelf. 


Here is the finished pantry! It makes me so excited because everything really has a place- which is the key to making it maintainable!!

So let me take you through each shelf...


This section houses  flours, sugars, dried goods & spices. I try to buy everything in bulk and then store it in reusable containers. The canisters on the top shelf I got through tupperware many years ago- click here to see similar product. Click here for similar canisters on the next shelf. Spices- there are so many ways to organize these.  Click here for a a similar spice rack. For labeling I have used a variety of different ways. My current favorite is using washi tape and a sharpie. It is simple, easily changed out if needed and it comes in so many different colors & is very affordable!!! Some other favorites for labeling in the pantry are: using a label maker,  This blog I found in Pinterest, & Better Homes and Garden free printables.


The next shelf is for snacks & the bottom shelf is the produce that doesn't go in the fridge. These bins are my favorite!! Click here to find them. I got the largest size.


On the top right side the coconut oil and olive oil that I use ALL the time are easy to reach & our extra paper towels. Canned goods and other oils & vinegars live on the next shelf. This three tiered shelf for cans is perfect!


The last 3 shelves contain~ nut butters and honey, gum and candy, cereal & oats. 
Crackers and chips nuts & popcorn. 
A wire holder for my saran wrap, foil and baggies just slides in. 
And finally paper plates, bowls, & plastic silverware!
Click here for baskets and here for wire shelf

So finally a completed pantry. I have to admit, it makes me pretty happy!!
Thanks so much for stopping by!!!


Here is my list:
  • Baking supplies
  • Fridge
  • Pantry
  • Drawers
  • Cabinets
  • Desk
  • Freezer

Faith :)

Monday, January 16, 2017

Fridge clean out

There is something about Saturday mornings that are a little bit magical to me. The potential things that I can get done are endless. As I pour my first cup of coffee I feel very sure that I will get everything that I plan on accomplishing done.  "Given enough coffee I could rule the world" plays through my head. So this past Saturday morning I wanted to get the rest of my list done in my kitchen:

Fridge
Pantry
Drawers
Cabinets
Desk

I started with my Fridge. It is amazing to me how much stuff gets shoved in there! I pulled everything out 

 Organizing my fridge has been done before, so I had some bins that work, but it just needed some tweaking... 


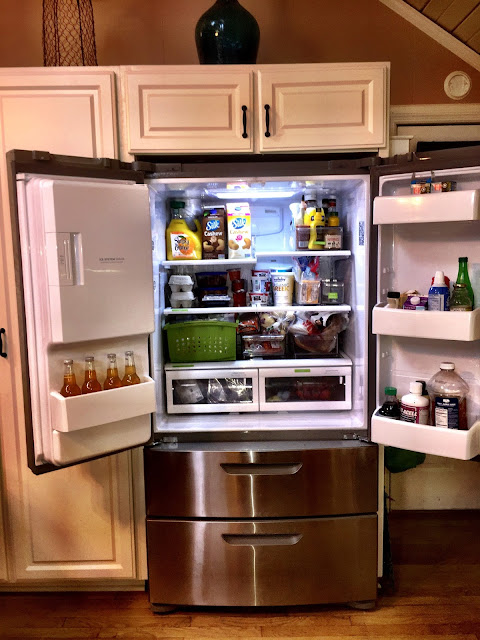
So I took everything out, wiped down all the shelves, drawers, EVERYTHING!! Even all of the little fingerprints on the outside- It was pretty gross in there!! Sorting all the items & throwing away anything expired was a must!


This green basket holds all my veggies, but with everything thrown in, it was very disorganized. So I took everything out and any veggies that we use for snacking or lunches, I portioned out in snack bags. Much better!!


Then I put everything back in. 
Top shelf:  orange juice and cashew milk, & the bin with condiments
Middle shelf: Eggs, left overs, yogurts, & cheese
Bottom Shelf: Veggie drawer, sandwich supplies & our Blue Apron Meals for the week
Left hand drawer: raw meat
Right hand drawer: fruit
Doors: butter, juice, odds & ends, & vitamins

Notice the nice, clean, fingerprint free outside of the fridge!! I use stainless steal wipes that are amazing! 

The rest of the Kitchen to do list will have to wait until next time!!!

What is left in my Kitchen clean out? 
  • Baking supplies
  • Fridge
  • Pantry
  • Drawers
  • Cabinets
  • Desk
  • & 1 new one- Freezer


Thanks for stopping by!
Faith


Saturday, January 7, 2017

Kitchen organizing challenge


Happy 2017! I hope your's is off to a good start! My New Year's Resolutions always involve some sort of organizing projects. This book will hopefully help me stay on track- I highly recommend it! She also has a blog that is full of inspiring ideas and projects! Click here to check it out!


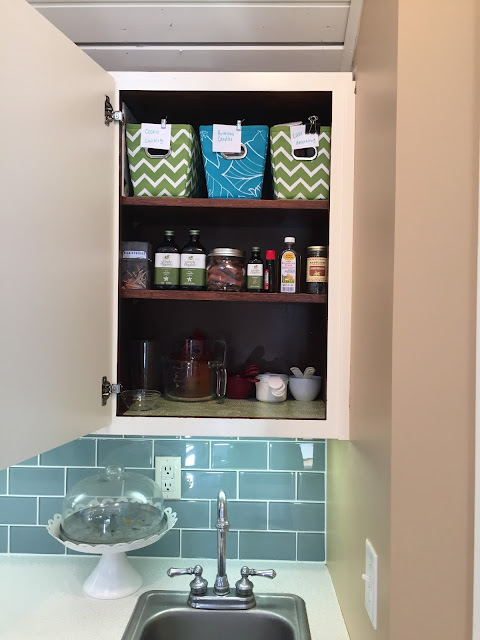
This first week the focus is the KITCHEN~ aka the heart of the home, aka the place that gets cluttered the easiest! Today I thought I would start with my baking area. Baking supplies are so easy to just shove somewhere and then have to dig through and try to find what you need when the time comes. Thankfully, there is a cabinet in my kitchen that I can dedicate to baking supplies. I gathered everything together that I wanted to go in the baking cabinet. On the top shelf went the items that I don't use as frequent (cookie cutters, cake decorating, birthday candles). Sorted it into small baskets & I added a simple label. Next shelf went extracts & cinnamon. Finally on the bottom shelf- all of my measuring items, since these are used pretty much daily- they needed to be easy to reach!


Click here to see this fun blog that I found this handy measuring chart at. I just laminated it and adhered it to the inside of the door! 

What are you organizing this month? My hope is to conquer another area of the kitchen each couple of days- including:
Fridge
Pantry
Drawers
Cabinets
Desk

Thanks for stopping by!
Faith


Sunday, October 30, 2016

Microwaves- easy to clean, but easier to just shut the door

My question today is- why do microwaves get so gross? The answer has to be because it is so easy to just close the door and never think about it. Until it's time to use it again & then the whole using it even though it looks gross, and then closing the door on it repeats itself.

I have a really easy way of cleaning it, but man it is easier to just close the door :) I am going to fix that today & show you how!

Honestly I am going to take a picture of how bad it is right now- but please promise me you won't judge me....


There has been several methods I have tried & the one that works the best, for me is:
Using a microwave safe dish

  • Add 1 cup of vinegar & 1 cup hot water~ add a toothpick to help with water not overflowing
  • Microwave for about 5-10 minutes 
  • The bowl will be extremely hot- be careful! Use an oven mitt to remove
  • Using a damp sponge- wipe interior of microwave
  • Remove the rotating plate inside to clean


The outside of our microwave is stainless steel, so I use some wipes specifically for that material to wipe down the front.

Now for the after picture:


TaDa!!

What is your favorite cleaning quick tip?

Thanks for stopping by!
Faith